Create & evaluate pulse check
Create surveys
With LoopNow, you as an administrator can create pulse checks in just a few steps. Access our extensive, scientifically based catalog of topics & questions and define in the survey settings who is asked about which topics, which persons (groups) can view the results, when the survey starts or ends and whether reminders should be sent to participants.
Create pulse check (survey)
| Topics & Questions | Adjust pulse | Answer pulse | Analysis of results |
- Navigate to "Manage Surveys" in the main menu on the left side via the clipboard icon.
- Click on "+ Create Survey".
- Click on the "Pulse" field & enter a title/name for the survey.
- Confirm by clicking "Next."
- Select one or more of the pulse topics and questions from the topics and questions library. You can also create your own topics and questions first (see next section) and then select them.
->> Infoblatt Fragenkatalog herunterladen - Confirm the selection of questions by clicking "Save change".
- Using the settings icon (three sliders) in the upper right corner, you can:
- customize the title of the survey
- add an invitation text.
IMPORTANT: This invitation text will be used as text in the invitation email and can be used to prepare the respondents for the survey in terms of content or to inform them about the purpose of the survey.
- customize the title of the survey
- Enter the persons or groups who should answer the survey, e.g. the entire organization or only individual departments. If you want your entire company to participate, enter the name of your company.
- Then choose whether the feedback should be anonymous or not (keep in mind the setting of the minimum threshold of required anonymous responses in the "Organization settings").
More about anonymity - In the next step, specify the users who are allowed to view the responses.
More about anonymity - Now choose a schedule suitable for your use case. Basically, we recommend setting a deadline to get answers faster. Use the schedule "Deadline" for this purpose.
- Fill in the corresponding date fields.
- Finally, save the survey as a draft or send it automatically at the time of the start date.
TIP: To create a digital feedback box, set up an anonymous survey that repeats daily (no deadline). This gives employees the opportunity to proactively leave their opinions or make suggestions in LoopNow at any time.
Introduce own topics & questions
| Create pulse | Adjust pulse | Answer pulse | Analysis of results |
Store questionnaires that already exist on paper or in other systems in LoopNow or create a new survey yourself.
If you want to enter new questions in LoopNow, it is helpful to first consider whether you want to use open questions or questions with a numerical scale. We recommend using numeric scales (e.g. 5-star scale) because they allow comparisons (e.g. between departments) and allow you to measure changes over time.
Tip: You also have the option in LoopNow to create your own scales with numbers, stars or text. Please make sure to consider the color code when creating them (green=positive result, red=negative result).
Please also note that only one scale can be assigned per topic due to the evaluability of the results.
To create or adapt topics and questions, proceed as follows:
- Navigate to the "Edit Topics & Questions" in the main menu on the left side via the clipboard icon.
- Click on "+ Add topic with questions" to create a new topic.
- Click the "Pulse" button, enter the title of the topic and click "Next".
- Via the settings icon you now have the possibility to adjust the title and the description of the topic as well as to delete the topic again.
- Click on "+ Add question to [topic name]" to add a question or statement.
- Optionally, provide a description or suggestions for improvement.
- Also adjust the translation if you want to output the survey in multiple languages.
- Confirm with "Save" and repeat the process to add more questions/statements.
- Finally, select the response/rating scale provided for the topic.
- Click on "<- ALL TOPICS" to return to the topic overview.
->> Now create topic with questions
Adjust pulse check (survey)
| Create pulse | Topics & Questions | Answer pulse | Analysis of results |
If you want to adjust the survey, proceed as follows:
- Navigate to the surveys overview in the menu item "Manage surveys".
- If necessary, filter by "PULS" to display only pulse surveys.
- Navigate to the survey settings by hovering over the survey title and then clicking the gear on the right.
- Now you can see the details and adjust them.
- Finally, confirm everything by clicking "Save".
The changes will be visible live in LoopNow. If you added users to respond after the fact (i.e., after the start date), then it is recommended that you invite them separately. To do this, navigate to the survey report by hovering over the survey title and then clicking the "Report" icon on the right. Under the "Participants" tab, you can see which users (if any) have already been able to participate in the survey and to what percentage, and send reminders or invitations if necessary.
Answer pulse check (survey)
| Create pulse | Topics & Questions | Adjust pulse | Analysis of results |
- All users who should answer the survey will be contacted by e-mail.
- Click on the button "ANSWER NOW!" within the e-mail received for this purpose. Alternatively, you can view at any time on the Homehub which surveys you have already answered and which are still open. Your answers can be viewed and edited via the Homehub until the deadline.
- Answer the survey using the rating/response scales and optionally enter a comment.
- When you get to the end of the survey, you will no longer see a question card, but the note:
- "Thank you very much!" if there are no more surveys open.
- "Thanks a lot, keep up the good work!" if you still have one or more surveys open to answer.
- "Thank you very much!" if there are no more surveys open.
Analysis of results
| Create pulse | Topics & Questions | Adjust pulse | Answer pulse |
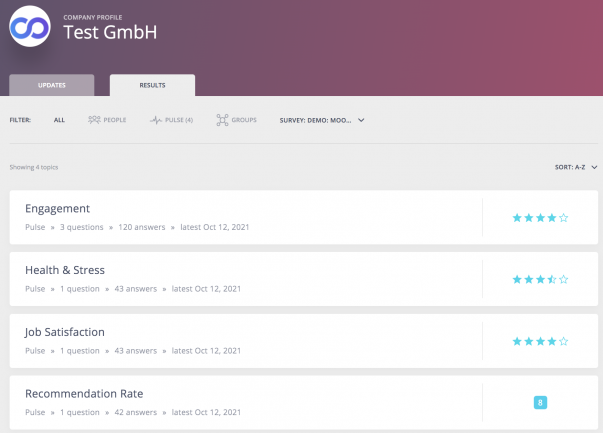
The menu item "Company results" takes you to the profile of your organization, where you can see the total results of all departments or locations, etc. together.
Under the "Results" tab, you can see the total results per topic. You can use the filter bar to select the survey you want to view. This view is often used to inform employees about the results of the surveys.

Identify strengths and potentials
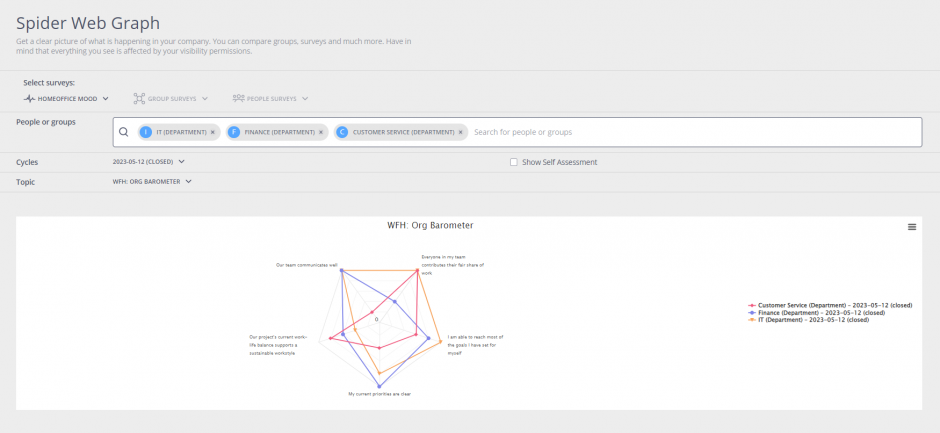
With the help of the dynamic network diagram in the analysis section of LoopNow, you can compare the results of different groups (e.g. management level) or individuals, depending on visibility rights, to get a good overview of the strengths and improvement potentials along different competencies. Also self vs peer assessment or a change over several survey cycles can be compared this way.

- Navigate via the main menu to the spider graph (analysis icon).
- Filter for the survey, for example, under "PULSE SURVEYS".
- In the search field, select person(s) or group(s) for which you want to view and compare results.
- Select the survey cycle (default: the most recent). You can also select multiple cycles here if you want to directly compare the differences between cycles.
- Using the topic filter, you can switch from the topic overview to the question level of individual topics, where you can see all results spanned across the questions of this topic.
Compare results
If you assigned user characteristics before creating your survey, you can view the results per user group (e.g., department or location) on the heat map after the survey and compare them with the overall average (1st row of the heat map). For many companies, this information is very helpful in quickly identifying where things are going well and in which areas there is a need for action.

Supervisors can get access to the results of their departments.
->> Manage visibilities


